OpenBuilds OX CNC router from Ooznest
This is the build of my OpenBuilds OX CNC router from Ooznest. Having already built a Hot Wire CNC foam cutter I got the bug to build a CNC router. In 2024, I upgraded the frame to 1000x750mm with a 32-bit controller.

After a lot of research, I decided to buy the OX mechanical kit from Ooznest, the 500mm x 750mm model, which can be upgraded if you need it to be bigger (I did in 2024).
I purchased my kit in November 2015, which has now been superseded by the WorkBee. I did consider building one from scratch using MDF and skateboard bearings, but I wanted something I could get up and running fairly quickly. The total build time was probably about 10 hours over a few days
Now Converted to USB
In 2021, I converted the router to USB using an Arduino-based controller board. I hadn’t been using it very much and even considered selling it. Other projects, including the CNC Foam Cutter, had taken all my spare time, and I use 3D printers for many parts.
You can read the post that inspired me to get the router running again, and you can also see the full guide on how to do the USB conversion
The Ooznest Kit
I’ve read some good reports about the kit and wasn’t disappointed when it arrived. The packaging is excellent, with items clearly labelled and boxed into major assemblies. I also purchased the router mounting kit at the same time as the trim router from Amazon, which is a Makita RTX0700CX clone at half the price. I later discovered the router is 65mm in diameter, while the mounting plate is 71mm. So, I bought a new one in the correct size, but later, I was able to 3D print a adapter to use with the OpenBuilds adapter.
The manual supplied is superb and nice and glossy! The kit is based on the OpenBuilds OX design by Mark Carew with some modifications to improve the rigidity of the machine. Mark has the build videos on OpenBuilds in the previous link which are very good.
Costs
The kit wasn’t cheap but I was very pleased with it. You can use Mach3, UCCNC, LinuxCNC or Arduino based kits. Here is my review of free CNC software
I used LinuxCNC on this machine and my CNC foam cutter but I haven’t any parallel port machines now. I updated it in July 2021 to run from USB and GRBL. My article on how to use LinuxCNC is here. Mach3 is very good but will cost you $175 whereas LinuxCNC is free.


Ooznest OX CNC router configured for Mach3
As you can see the build of the OX CNC router is almost complete. The next step was to get the limit switches and the emergency stop installed and wired up.
I’ve used a 4 port RJ-45 socket to connect my steppers and limit switches. Only 4 of the 8 wires in the Cat5e cable are used so I can use the two for the switches. The switches are wired in series as I had done on my old CNC hot wire foam cutter to pin 11.

This allowed me to swap back to my old hot wire machine just by plugging the Cat5e cables back into the towers and running a different config in Mach3. I now have it wired directly with drag chains to an MKS Gen L controller.
The small 5 port ribbon connector on the controller I used to connect all the switches in series. As I used RJ45 LAN cables with 8 wires I was able to use 2 of the 4 spares to get the inputs back to the controller board.

It is wired up as above and you can download a copy here Limits diagram
Mach3 is clever enough to know which axis the input relates to. This confused me a bit a first but if you follow this setup it works fine. When you press REF ALL HOME each axis should home, it’s quite satisfying to watch it all work.
When the switches are wired up go to the Mach3 diagnostic screen and test that each switch lights up all LEDs as screenshot shown below

Here’s how I fitted my limit switches. For USB conversion I am completely wired the machine and changed the limit switch locations.


Emergency Stop
I’ve wired the E-stop with a Cat5e cable back to the controller. Which has an RJ-45 socket installed and connected to the E-stop on the TB6560. The joypad works via a plugin on the Mach3 website http://www.machsupport.com/software/plugins/ and can be configured to move all axes and buttons set to a function of your choice. Works well.
Router Set-up
I’ve opted for the Ooznest router mount which didn’t fit the Katsu router, my fault should have been checked. I did try adding some packing but it wasn’t ideal so I purchased another from eBay. I eventually 3d printed a collar for the router and this works fine with the OpenBuilds adapter


The build is almost complete the OX CNC router works and I have the home limit switches installed. It took some figuring out as I used the 2 spare wires in the RJ45 cables to send the signals back to the TB6560 driver board.
All the switches are wired in series which may sound strange but it works well as Mach3 figures out which axis is moving. This makes the wiring a bit simpler. So all I need is a ground and pin 10 on the TB6560. I’ve also made a probe touch plate that uses pin 12.
Y-Axis with two NEMA 23 stepper motors
The Y-axis uses two stepper motors so both have to work together. One way this can be achieved is by joining the step wires and reversing the direction wire on one motor. But then you force all the current through one driver, which may exceed the limits.
A much better way is to wire them to their own driver and slave the axis in the controller software. Both Mach3 and LinuxCNC can do this.
For Mach3 set the option “Home Slave with Master Axis” on the Settings screen.
For LinuxCNC we do it in a slightly different way by setting the pins as below

Here’s the full setup for LinuxCNC
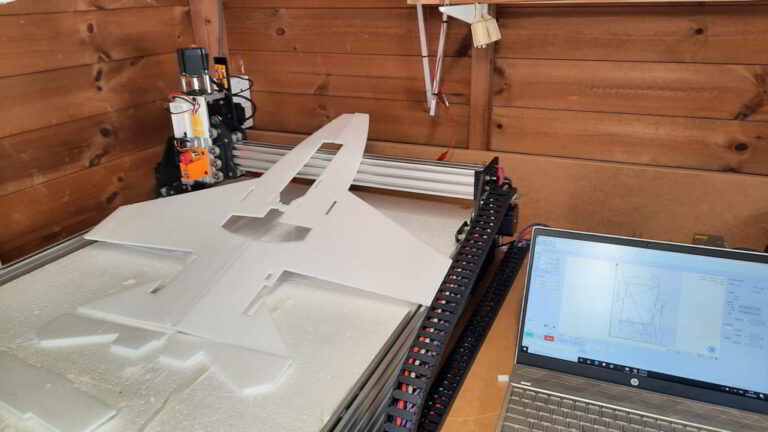
The part below was the first test of the OX, just using a piece of depron foam. I used SketchUp with the Phlatboyz extension Sketchucam and it worked well.
Then I made some mounts for the Dremel, which came out well and hold it very securely.


Using the OX router with LinuxCNC
If you want to go the LinuxCNC route, I have an article on setting this up and a video below showing all the steps. You will need to use a desktop machine with a parallel port. This is still a good option even though the parallel port is now obsolete. PCI parallel ports adapter cards are an option, but check the LinuxCNC forums before purchasing. Some guys have had issues with some cards.

CNC Router Software
So when you have built your machine, you’ll probably want it to make something. So how do you go about it? You need to send G-codes to your machine so that the interface board will convert these into electrical pulses. These pluses then move the stepper in either direction and hence move the router.
There are many different G-codes; each one has a specific task. For example, the G-code G0 X5 Y6 Z-0.5 will move the axis to 5 mm in the X and 6 mm in the Y and the Z down to .5, assuming the machine is working in millimetres. You don’t need to learn these codes, but they are useful if you know a few. CAM software takes your design and converts it into G-code that’s sent to your machine.
There’s a huge range of CAM software out there — some are free, while others range from inexpensive to seriously pricey. As a hobbyist, I always try to use free software whenever possible. But over the course of my CNC projects, I’ve still ended up spending a fair bit on software.
Fortunately, the CNC router I built runs well with free software and produces great results. For the CNC hot wire foam cutter, though, I did have to invest in paid CAM software to get the features I needed.
Was it a good buy?
Yes, I have been very pleased with it, but I haven’t used it as much as I thought. I tend to use 3d printing for most modelling pieces I can’t make in foam on my Creality 3d printers. But now I have adapted it to use a CNC Needle cutter it is back in use again.