CNC Foam Cutters Builders Gallery
The images below show many variations on the foam cutter with further details below.


The CNC Foam Cutters builders gallery shows machines built by fellow enthusiasts who have been kind enough to allow me to show their pictures.
As you can see, you don’t have to follow my build or use the same materials. 3d printing is becoming a popular way to build CNC, quite often referred to as MPCNC (mostly printed CNC)
Franck’s Foam Cutter
This build uses the SKR Pico 32-bit control board and looks great in red.


Kirtik competition design
From Kirtik
“Thank you for posting such valuable information online, posting indepth videos and also promptly replying via email. I made the CNC, made an airplane for a national level aerodesign challenge in mycountry and won 3rd place. It was a very rewarding experience and your resources made it very easy to follow along with my plan.”


Bob’s Build from the USA
This build looks very professional and what’s even more impressive is that Bob is 86 years old. He used GMFC for many years but now uses the Arduino Mega 2560.

Alan’s Build from Australia
This looks very neat and Alan has added some backlash compensation to his design. As you can see his test wing core came out very nice.


Richard’s Video of his Foam Cutter
This is a very impressive build with many unique features and Richard has a very good video to show his work. Great work and storage when not in use.

Hasan’s Needle Cutter
This is Hasan’s needle cutter which is used for cutting foam sheets. This is a quicker way if you build many of the foam board models. I’m a big fan of these builds and Hasan has made a very cool machine.
Made from aluminium extrusions and 3d printed parts he has designed himself.


Allen’s Build
Allen has used EMT(Electrical Metal Tubing) with 3d printed parts for his design which looks very good. As you can see from his test cut works very well. If you have a 3d printer and some design skills then you can make a foam cutter from easily available parts.


Wessie’s Build from South Africa
A very clever guy who has used a load cell and stepper motor to tension the wire. Very useful for swept wings. I’m going to try this myself soon. He’s using the Marlin version of the foam cutter firmware as you can see on his controller.


Jeremy’s Build
Some very impressive work from Jeremy. The XPS foam cores look very good and will make a unique flying wing. Notice the use of a cooker hood to remove the fumes created by the hot wire.


Hasan’s Build
This is a very nice design using belt drive something I’ve considered myself. Hasen has made a great good and as you can see is a very versatile machine with his example cuts.


Mario’s Build
This is another well-designed cutter from Mario.


Using Recycled Parts
Vincent’s description of his build
I’ve built mine using some spare parts from old, decommissioned equipment, the X-axes are made from old blueprint copier carriages, and the Y axes from some pill machine parts, it’s not pretty but it works great.


John’s Avro707 build using his CNC Foam cutter
John’s build of the Avro 707, the testbed for the Vulcan, looks very impressive. He’s used DevFus Foam and DevWing Foam 2 with great success. His CNC foam cutter looks very good and he uses the bow method to tension the wire.
John recently sent me pictures of the finished model and he’s waiting for good weather to do the maiden flight. A very talented builder and the Avro 707 looks fantastic.


Jose’s Foam Cutter and the RC plane he made with it
Jose’s foam cutter used slightly heavier materials so he reduced weight by cutting many holes. Look cool as well. As you can see he’s made a very nice model with the foam cutter. He’s called it KEITH-0, thanks, Jose.


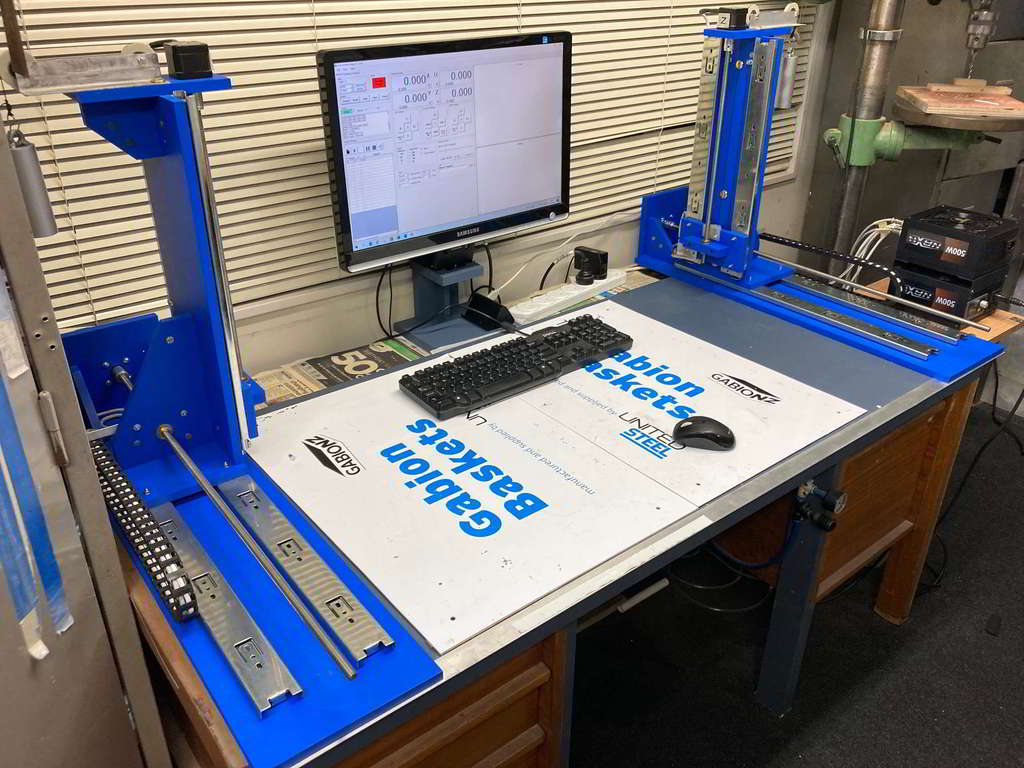
Alan’s CNC Foam Cutter build
Alan’s machine looks very good painted in blue he’s made a few modifications to the design as you can see.
Here are a few words from Alan about his build.
“Towers and mechanical parts. You will notice that I have inverted the drawer slides. My logic was to keep dust and other debri out of the slides. We all tend to generate some sort of dust in our workshops. In hindsight, I would not do this on the vertical slides as it adds a lot of weight to the carriage. Hence the elaborate counterbalance weights. All unnecessary but we never admit to making mistakes. :)The tension device for the hot wire is a spring re-coil that you use for your security tag or keys. Not sure if it will have enough tension but has a lot more travel than a spring and is fairly consistent. Had a few of these lying around.
The two photos of the towers. There might be a hidden advantage of my counterbalance weights. The drawer slides have some play and the wire tension might pull the towers towards each other. The cantilever weight might cancel this out.???? We will find out.
This was a very interesting build and a challenge to maintain accuracy throughout. I do not have a 3D printer but I do have a small lathe hence the modifications were easy to make. All parts bought were found on Aliexpress and items like aviation plugs are very cheap and worth a few dollars. It also makes it easy to dismantle and store.
A great project to tackle with every aspect thoroughly covered by RCKeith. Many thanks
Power supply and electronics. My son is in the IT business so there is a cupboard of parts waiting to be recycled. The power supply is a modified PC 500W unit. I used a matching case to house the Arduino and Ramps board. Lots of space and the original cooling fan is used. I used aviation plugs (4 Pin) to make an easy transition to the field wiring.“


Tom’s CNC foam cutter and wings
Tom’s machine looks very good and he’s made the wings for a Fox 3-meter glider. Nice work.
From Tom
“G’day Keith, just thought I would show you my first real cutting job, they are replacement wings for a Fox 3 metre glider. The original wings were destroyed by impact with a tree. I used Jedicut, the airfoil at the root is Clark Y and the tip is the thicker Clark YM-15 (had to be thicker to accommodate the 17mm carbon tube spar – each wing was cut in 2 sections – 1metre and 450mm “


Hai Foam Cutter
Hai has used linear rails and 3d printed parts and looks like a well-constructed machine that should produce some great models.


Tom’s Foam Cutter
Tom has used a very ingenious way to tension the wire with a pulley and hinge


I constructed an adjustable foam support table so that I can adjust it to be in the same plane as the cutting wire (I also adjust the Y & Z limit switches) and the X/Y slope
You can see that I only used 1 vertical drawer slide for the Y/Z axis. This appears not to be ideal because as the vertical towers travel the wire load causes rotation about the vertical axis and there is movement in the drawer slide. I will monitor the impact during testing and calibration however I expect that I will be adding the second drawer slide on each tower.
A few words from Tom
Marc’s Foam Cutter
Marc has used the TB6600 drivers for his machine with linear actuators
I used 4 linear actuators from eBay, an Arduino 2560 mega with a screw terminal breakout board, and wired up 4 x TB6600 stepper drivers to command the stepper motors. Fortunately for me, the Ramps 1.4 board was documented well enough (thank you open-source community) that I was able to garner the correct pinout for using the TB6600 drivers. I am having fantastic results with this formula, and wish to express my appreciation.
A few words from Marc


Jim’s Foam Cutter using 3d Printed parts
Jim builds looks very good here’s a few words from him
Here are the links to the machine https://www.thingiverse.com/thing:1672015 and the modifications I made https://www.thingiverse.com/thing:4604186
I just used a RAMPS 1.6 with a 24-volt power supply for about 4 hours today. The specs for the RAMPS 1.6 on Github say that it is equipped with a higher rated MOSFET and regulator.I also was using the foam cutting software that you worked on.
Seems to work fine.


Texas A&M Racing Senior Design Team
Wings don’t just go on aeroplanes. Justin has built the foam cutter for the wings to provide downforce on their cars. He’s kindly sent some pictures of the cuts and has managed to produce profiles 48″ long after some testing. Please have a look at their website if you are interested in cars and engineering as I am. Hopefully, Justin can keep me updated with the progress.
Our race car has multi-element wings on them. These are the flaps for the front wing and the rear wing. We still need to cut them down wing spanwise – the front wing splits in 20″ halves and the rear wing span is 40″. Nothing super fancy like a taper, but the spar holes, in particular, came out really nice. We’ll be laying up carbon fibre on top of these airfoils for our wings.
A few words from Justin

Belt Driven Machine by Chris
This is a very nice machine by Chris who’s used belts to drive his machine. Some great cuts as well


Here are some notes that Chris has kindly provided on his build
General Layout… Constructed mostly of 20×20 extrusion and 3D printed parts. 900mm X 640mm
Uses a Belt drive on both Axis with a double back reduction to halve the speed and double the torque and resolution. Works well so far – very accurate. Belt ends are fastened top and bottom. Two opposing idlers move the carriages.
Wire tension is set by a “floating” weight that moves with the UZ carriage – there is enough “free Travel” to take care of all wire length changes from extreme corners. Power is fed to the wire by two Printer nozzles on the vertical plates – wire goes over two pulleys to the hanging weight witch travels beside table – tension is set by weight and remains constant in all conditions.
Electronics board ( not mounted yet) – 12 and 24v supplies – 10 amp auto fuse on 24v side replaces 16v polyfuse.. had issues with feedback triggered limits so I tried the little homemade filter board and it works great with no need to rewire and shield – just 4- 1uF caps across the feeds and issues gone.
All working well (thanks to some excellent documentation from you Keith) – this “tiny” core was cut in extruded foam – 100mm root – 80mm tip and 400mm long with 2 deg washout. almost a perfect core – better than I have ever made (or seen) before. Flaws you see were in the foam pre-cut. If it can cut small cores this well it will work great.
This core was made with the following process for testing – Compufoil to DXF – DXF into Turbocad and back out as DXF – DXF into Jedicut – Gcode out of Jedicut and to X5 – Leaves lots of options for playing and adjusting.
Kjell Build
Kjell has built his machine exactly as the build on the website and has made a excellent job.

Tom’s Foam Cutter
3d printers are very popular for making foam cutter parts. Tom has used PETG and made an impressive looking machine. Click the image for a larger view.


Bill’s Foam cutter
This is Bill’s foam cutter built following the plans. Bill has posted a lot more pictures on RC Groups so have a look at a great build.

Colin’s Foam Cutter
This is Colin’s foam cutter he’s used the WingWire software developed by Dominik Schuler and very happy with it. Dominik’s post on Thingiverse has all the details including the software download


Jeff’s Machine uses extrusions
Jeff has built his machine using aluminium extrusions. It measures 700mm on the horizontal axes, and 300mm on the vertical axes and has a separation of 750mm. Jeff uses Mach3 and 4 with NEMA 23 steppers and DQ542MA stepper drivers. A very good looking foam cutter.

Ian’s Foam Cutter
Ian has built the foam cutter from the plans and he’s made a very good job of it. He’s also found from testing he gets much better results with a bench power supply to power the hot wire.


Mark’s 3d Printed Foam Cutter
Mark has used PETG filament and Baltic Birch Ply. The controller mount with the fan looks very good.


Tony’s 3d Printed Foam Cutter
Tony’s 3d printed parts are here on Thingiverse


Nathan Foam Cutter Using LinuxCNC with the Parallel Port
LinuxCNC with the parallel port is still a good option in 2026. Recycle that old desktop and you have a very good foam cutter that can use more powerful NEMA23 stepper motors.

Peter’s USB Foam Cutter using Lead Screws
Peter decided to use lead screws rather than threaded rods. Check the parts list where I have listed the sizes required. You will need to calibrate the steps/mm because the pitch and diameter are different.

Klaus has converted his TB6560 to USB using an Arduino
If you want to convert your parallel port controller to USB, then an Arduino is a good option. Mach3 and LinuxCNC won’t work with an Arduino.

Tony’s Machine
Tony has used right-angled stepper motor mounts on his machine.


