How to build a Hot Wire CNC Foam Cutter – Parallel Port Version
This post details my original CNC Foam Cutter build, which I’ve now updated to a new version. Here’s the link to build the USB version https://rckeith.co.uk/how-to-build-a-usb-cnc-hot-wire-foam-cutter/
I would encourage you to build the USB version because the configuration of Mach3 and LinuxCNC on a parallel port computer is quite lengthy. Calibration is also more involved. So if you are new to CNC foam cutting then build the much easier USB version.
The parallel port has long since been discontinued. If you have an old parallel port PC kicking around, it’s an ideal candidate.
Why build a Hot Wire CNC Foam Cutter?
For me, it was a way to build wings and fuselages for RC aeroplanes that weren’t readily available. Doing it yourself (DIY) is not as hard as you may think.
Traditional building methods for RC aeroplanes involve lots of Balsa wood cutting and glueing. I can cut a foam wing core in about 15 minutes and usually, I cut several at a time. Building your models is very rewarding and when they fly well it’s a real buzz.
I built my first machine in 2012 and here are a few of the projects I’ve made with it


How does it work?
If you’re not sure what a Hot Wire CNC foam cutter is, then let me explain. Most types of foam can be cut with a hot wire, and if you can control the wire accurately, then you can make wings and fuselages for RC aeroplanes and many other things, e.g. signs. It’s possible to do without a CNC (Computer Numerical Control) machine just by guiding a hot wire over templates. This method is less expensive and is a good place to start on the hot wire CNC foam cutter journey. You’ll get a good experience of working with a hot wire. My Super VC10 wings were made this way before I had my machine.
Is it difficult to build?
No. If you are reasonably practical, then you have all the skills you need. Don’t be put off by the electronics. It can look a little daunting, but if you follow my articles on the website or sign up for the eBook, you have all the information you need. If you do need help, reach out to me via the contact page, and I’ll get back to you with some answers. I get quite a lot of questions from all over the world asking for advice and recommendations on parts to buy. I’ve provided links to all the parts I’ve used and recommendations.
After a lot of research and some really good advice from CNC forums, I designed this version. Full details on this page https://rckeith.co.uk/cnc-detailed-build-and-plans/

How much does it cost to build a Hot Wire CNC Foam Cutter
Probably not as much as you think. My 4-axis CNC kit came from China and included the stepper motors, controller board and a few cables. These vary in price, so check the parts list for the latest. I check them regularly to make sure they are still the best in my opinion.
The power supply I originally made was from two old computer PSUs, and the rest came from local DIY stores. See the build page for a full list with links. I’ve spent more money on software than the rest of the build, but there are now some very good free alternatives. Check the build page
The majority of the cost, if you use the free software options will be the CNC controller, stepper motors and power supply. If you have an old desktop PC with a parallel port, then this will keep the cost down. Working on average prices in 2026, if you had to purchase everything except the PC, then I would budget for around $280 (US) and £220 (UK), but you may be able to do it for less if you have some suitable materials already. The USB version is a little cheaper, around $200, because it’s based on 3d printer components. These are so popular now that they keep the costs down. But do check the parts list for the latest prices.
It’s a bit of an investment, but it won’t take you long to recover the cost. I’ve built several wings and a couple of fuselages, and it’s a real buzz when that wing core reveals itself from the foam block. Foam models can be quite expensive now; guys at my flying club often pay £200 to £400 for a jet with a big EDF. I’ve seen a couple of these destroyed beyond repair.
Parts required to build a Hot Wire CNC Foam Cutter
- Stepper Motors – these drive the towers where the hot wire is attached
- Control Board 4-axis – sends signals to the stepper motors to move a certain amount and in which direction. Receives inputs from limit switches and pendants
- Computer – drives the control board. It receives g-code and turns that into signals for the control board.
- Lead Screw – connected to the stepper motors and then the towers to move them in the desired direction,
- Software – I did use LinuxCNC, but started with Mach 3, which turns the g-code into a signal that the control board and stepper motors can use. I then used Profili2 Pro and DevFus Foam to generate the g-code from the design. You can use LinuxCNC and free software to generate g-code for wings and fuselages. Check my article Free CNC Software
- Drawer Slides – used to provide vertical and horizontal movements for the two towers
- Power Supply 24V – this powers the control board and the stepper motors
- Hot Wire – usually nichrome wire.
Foam Cutter Accuracy
I’ve decided to use threaded rods for the lead screws because the accuracy required for hot wire foam cutting is not as critical as a CNC router. However, I still get very good results when I compare the cut parts with the scale drawings.
Lead screws are a lot cheaper now compared to when I first built the machine, but still more expensive than the threaded rods. If you prefer, I would use T8 lead screws.
Power Supply -24 Volt
I used 2 PC ATX Power supplies in series to give 24 Volts. This can be a little dangerous if you’re not careful to isolate the second PSU, so I’d recommend purchasing one specially designed to give 24 Volts. These are now quite cheap and take up less space. Details in the parts list
Original Build of the Foam Cutter
Below are some pictures of my original build. It used materials from an office clear-out. This was high-density MDF and was very stable but heavy. I was on a limited budget and this wood was free so I built the machine with it.
Back in 2012, 3d printing wasn’t as popular as it is now, so I purchased a 4-axis CNC kit that included all 4 NEMA23 stepper motors and the TB6560 all-in-one controller board. It proved to be 100% reliable.
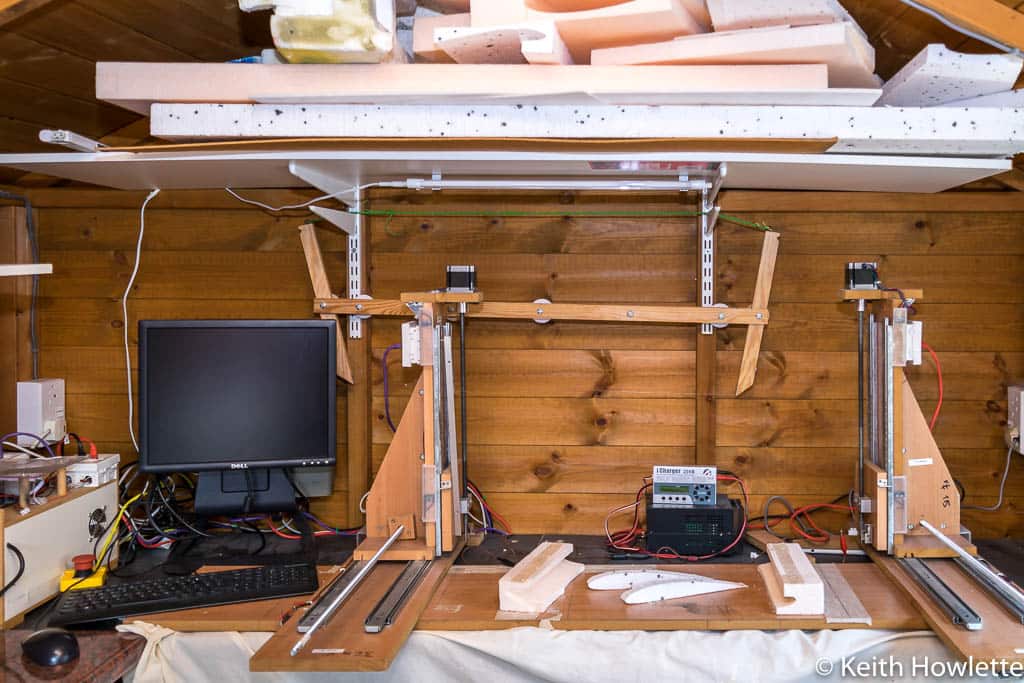


The build was finished see the pictures above and the video below. Tested and it works. I used RJ45 cables and sockets to connect the motors to the controller.
CNC Foam Cutter Controller Software
To control the parallel port CNC machine, you need some software, and after much research, I originally decided to go with Mach3 from ArtSoft http://www.machsupport.com/. It’s very well supported, and several videos on YouTube describe how to install and configure it. The unlicensed version allows 500 lines of g-code, but you’ll be surprised how many lines it can take to make a wing. The licensed version costs $175.
What Computer can I use?
The computer needs a parallel port, the one that printers use to connect to. These are obsolete now but you can still find them quite easily. Mach3 or LinuxCNC will run perfectly well on very modest hardware.
I’ve used an old Dell GX620 computer running XP, and no other unnecessary software has been installed for Mach 3. For LinuxCNC, I used the same machine and just swapped the disk over. There are other options now for USB and Ethernet(LAN) connections. Check my post here https://rckeith.co.uk/mach3-parallel-port/
Software to generate G-code
G-codes are the instructions sent to the machine that tell it how far and in what direction to move the stepper motors. You don’t need to learn g-code as software converts drawings into code. I originally used Profili 2 Pro and have now upgraded to DevWing Foam 2, which does a lot more than generate g-code for wing profiles. Here’s a video tutorial series for DevWing Foam, which is on my YouTube channel link here
DevWing Foam 2 is the next generation of software replacing Profili 2 Pro. If you’re just starting, I wouldn’t recommend this just yet, as it can look a bit daunting. My advice would start with the free options below, and then, as your skills and needs progress, get DevWing Foam 2. It’s the best software for generating the g-code and is well-supported.
Here is a free wing g-code generator that will generate the code for you http://swarfer.co.za/rc/wire/index.php I’ve used it on my machine, and it works well and is fairly easy to use. Check my post here https://rckeith.co.uk/foam-wing-free-cnc-software/.
The Hot Wire
The wire is usually ni-chrome, but several others can be used, including guitar strings. I’ve powered my wire with the iCharger 206, which has a foam cut program, but I have used a car battery charger connected to a house dimmer switch for manual cutting. This allows control of the heat and works very well. An RC battery charger set to NiCad or NiMH also works.
I get the best results from very thin wire about 0.4mm in diameter. Doesn’t require as much current to heat. The kerf value, the amount of foam melted away, is very small. This helps in the design process. I mostly use the default settings in the software and sometimes adjust the kerf value for swept wings.
The wire between the 2 carriages can be tensioned by a spring so they can move independently for tapered wings. I’ve sometimes used a pulley with a weight attached. The springs are fine for wings, but I’ve found when making fuselages, the wire can get some very steep angles, which puts too much tension on the carriages.
Using a pulley with a weight keeps constant tension on the wire, whatever angle it’s at. I’ve used a 20-pound fishing line with a wheel on an axle to route the fishing line with a 1.5 lb or about .7kg lead weight. The pictures below should help explain it. Ran a few tests and it seems to work well. It can be tricky to get adjusted correctly, and you have to ensure the weight doesn’t bottom out.
It works
It’s quite exciting when you get it all powered up move the cursor keys, and see stepper motors spinning. The video shows a small test of an aerofoil, which was about the 5th attempt. The hot wire cuts my radiance, so it’s melting the foam in front of it. My first pieces were not very good as the feed was too slo,w but as you can se,e it didn’t come out too bad when I got the cut the feed right
Below is the flying wing, which was the first model plane I made with the machine. This was just a quick test as a proof of concept and it’s proved to be the model I fly most now. It flies well and is fast. Profili2 Pro was very good for generating the code and has a massive database of aerofoils. It’s been replaced by DevWing Foam 2 now.
Hope you found this of interest, and if you need any advice or help, then you can contact me through this website.
I’ve included the configuration for Mach3 with the TB6560 controller board on this page Mach3 TB6560 configuration For LinuxCNC check my article here on how to configure it https://rckeith.co.uk/foam-wing-free-cnc-software/
The first aeroplane made with the Hot Wire CNC foam cutter
This is the first flying wing I made with the CNC machine, and it was a little gem. I did fly it most weekends. It is super fast with a 2200KV motor and a 6×4 prop. It’s a blast. If you want to build it then check https://rckeith.co.uk/hot-wire-cnc-ymf-38-flying-wing/. I’ve included the g-code for each wing as well.
Crashed her in 2017, pilot error, doh! So I made another. Here’s the full playlist

I’ve now made a Hawker Hurricane with the CNC machine both wing and fuselage, you can see it here https://rckeith.co.uk/cnc-hot-wire-hawker-hurricane/
I’ve also made a much bigger wing for FPV(First Person View) with it as well details here https://rckeith.co.uk/fpvfw/
The CNC machine is now starting to pay for itself as I don’t buy ARTF models anymore, nothing against them but I just enjoy researching and making my own RC aeroplanes.
Updates I’ve made to the Hot Wire CNC foam cutter
I’ve now retired this original machine and now use the USB version. During its use, I decided to make an effort to get LinuxCNC working in 2018, and it was my preferred software for the parallel port version of the foam cutter. My video below shows how to make wings using Free software with LinuxCNC

After making several models and getting through a lot of foam, I’ve only changed the couplers to the stepper motors. The rubber hoses occasionally came off, which ruined some foam, so I purchased some proper coupler,s and these have been very reliable. Details on the build page.
Parallel Port Build Details
Plans, Parts and Instructions
The new USB foam cutter can also be built to use the Parallel Port; full details are in the eBook.
| Qty | Description |
| 1 | 4 Axis TB6560 Controller Board |
| 1 | 4 Axis TB6560 Controller Board All in one with power supply. Drivers all on one board are usually cheaper |
| 4 | NEMA 23 Stepper Motors 57BYGH56-401A or similar. |
The parallel port build is almost identical to the USB version except for the electronics. The plans have an alternative part B for NEMA23 stepper motors. These are bigger than NEMA17’s which you can still use.
I’d recommend you buy the controller board and stepper as a kit, including a power supply. Check the parts list below to see what I’ve used and recommendations.
TB6560/TB6600 controller with the parallel port
This controller is used with Mach3 or LinuxCNC, which interprets the G-codes and, via the controller board, moves the stepper motor. There are a few alternatives, but I’ll list the ones I’ve purchased and used.
The all-in-one board may be a little easier to build with. With the separate drivers, there is a lot more wiring. My all-in-one board has been 100% reliable and never missed a step. You may find comments on CNC forums saying they are no good, but I’ve had no issues with mine.

TB6560 DIP switch setting on my Blue Board
I’ve had a few comments on the website from people struggling to get their machines working correctly. Here’s how I have mine set up.

This is configured for 75% current, fast decay mode and 1/2 micro-stepping. My stepper motors are rated at 2.8 amps and the drive will supply 3 amps at 100% so I reduced this to 75% to give me 2.2 amps the motors work fine and have run like this for several years.
LinuxCNC and Mach3
LinuxCNC used to be called EMC2 and has been around for some time, and I prefer to use this instead of Mach3 for both of my machines. I’m now using the USB version. I have a full post on installing, configuring, and LinuxCNC here
Mach3 has been around for a while and is well-documented with some good tutorial videos on their website. Although not specifically for a hot wire machine, they are worth watching. I’ve watched them several times http://www.machsupport.com/help-learning/videos-tutorials/
Mach3 and LinuxCNC are designed to use the old parallel printer port which is now legacy, which modern PCs don’t have anymore. There are a few options:
- Get hold of an older PC with a printer port. Mach3/LinuxCNC doesn’t need a high-performance PC so most older PCs will work fine. Plenty on eBay from around £50/$80
- Install a printer port add-on card.
- Use a USB or Ethernet motion controller board. This, with the driver software, will configure Mach3 to use either your USB or Ethernet port. The TB6560 then plugs into the motion controller. Check my article for options https://rckeith.co.uk/mach3-parallel-port/
Using Mach3
I used an old Dell GX 620 USSF running Windows XP with 2GB of RAM. Mach3 will only work on a 32-bit version of Windows. I did use LinuxCNC on this machine as well. I had a disk for each and swapped it out when I needed the other.
My PC was a fresh install of Windows for Mach3 and nothing else on it. It wasn’t connected to the internet, so I did not need anti-virus and updates. I’ve even switched lots of unnecessary services off. I got the g-code by using a USB memory stick.
The configuration of Mach3 with the TB6560 and all my settings go to this page https://rckeith.co.uk/4-axis-cnc-hot-wire-configuration-for-tb6560-and-mach3/ includes setting home and limit switches.
Using LinuxCNC
This is a good option and works well. I have full details here https://rckeith.co.uk/foam-wing-free-cnc-software/
The display is much better in my opinion for 4-axis foam cutters; Mach3 can look a little weird on 4 axes.
Would I recommend the ParallelPort Foam Cutter?
No, the parallel port version of the CNC Foam Cutter worked well, but it’s much easier to build the USB version. The configuration of Mach or LinuxCNC requires a lot more work and time. The only reason to use it would be if you already have a parallel port controller and an old PC to drive it.